

How To Clean A Clogged Heater Core
- Author
- Recent Posts
Besides many examination devices, Martin at present has his fourth own 3D printer running and prints every bit a hobby for friends, family and himself. He is happy to share his feel with each new article.
Disclosure: Links marked with * are Affiliate Links. I earn from qualifying purchases if you lot decide to make a buy through these links – at no boosted cost for you!
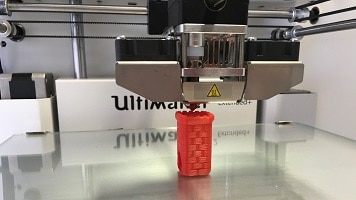
Whether for the hobby, in the pocket-size specialist workshop or in big-scale industrial product, 3D printing has become irreplaceable and offers almost infinite possibilities for producing big and small printable products with astonishing particular in minutes.
Even modern medicine makes use of this technology and is already producing prostheses or artificial organ parts using 3D printing.
As great every bit this press method is, there is i trouble in particular that is annoying: a clogged printer nozzle!
Calorie-free clogging of a 3D printer nozzle tin can be removed well with cleaning filament*. Heavy clogging with needles, acetone, various pull methods and high heat. Frequent cleaning with cleaning filament, brushes and newspaper towels volition prevent clogging.
In this text you will acquire how various types of clogging manifest themselves, what the causes are, how y'all make clean the nozzle and how you lot can prevent clogging.
Contents
- 1 Symptoms
- 2 Causes
- 2.1 Wrong Nozzle Peak
- 2.2 Incorrect Temperature Setting
- 2.3 Low-Quality Filaments
- 2.four Dust & Clay
- ii.v Don't Burn Anything…
- iii Nozzle Cleaning
- 3.one Cleaning Filament
- 3.2 Push Filament Through
- 3.3 Needle
- iii.4 Acetone
- 3.5 "Atomic Pull"
- 3.half-dozen "Common cold Pull"
- iii.7 Incineration
- 4 Replacing the Nozzle
- v Prevention
- v.1 Daily
- v.2 Weekly
- 5.3 Monthly
- 5.iv Quarterly
Symptoms
First of all, permit'due south clarify a very basic question: How can you tell if the printer nozzle is clogged?
The following signs indicate with loftier probability that your printer nozzle is clogged:
- The filament does not flow: If you take inserted a filament, your printer has been heated to the appropriate temperature and no filament is flowing or the flow is not compatible, you tin can be certain that the nozzle is clogged. This includes the following signs: The filament, i.e. the mass with which your object is printed, does not flow straight out of the nozzle, but curls, flows in a bend, flows in uneven quantities, the filament strand is repeatedly interrupted or no material comes out at all.
- Your printed object is faulty: peculiarly areas that are very thin accept holes, edges and borders are blurred.
- The extruder makes "click": The extruder in your printer presses the material. If it makes a clicking sound, this indicates that it is non pressing confronting the material, for example, considering it has hardened and the nozzle is sticking.
If you lot discover ane or more of these symptoms, your printer nozzle is probably clogged.
Therefore we want to evidence you some very practical solutions how you lot can easily make clean the printer nozzle yourself.
But starting time you will find out what causes a blocked nozzle in most cases. This manner yous will not only acquire what to do in one case the proverbial child has fallen into the well. Nosotros as well tell you how you can avoid the problem in the time to come.
Causes
Bottleneck of the 3D printer nozzle is caused past burnt-on textile residues, like to burnt-on fabric in a cooking pot.
For instance, you have set the wrong temperature for a filament, or filament remnants from a previous print are burnt in the next impress at a higher temperature. There are too filaments that are partly fabricated of natural fabric, which contains coarser particles that stick more easily than constructed material.
Wrong Nozzle Top
The adjustment of the nozzle height, i.e. the Z-coordinate, has a considerable influence on a make clean print result. If the nozzle is set as well loftier, the filament has a long way to the printing surface and cools down too much too fast. It is then no longer formable, does non stick and your object becomes misshapen and/or defective.
If the 3D printer nozzle is set too low, the filament will not accept plenty space to exist extruded cleanly. The result: a totally smudged thermoplastic!
In bad cases, the material has and then little space that it is pressed back into the nozzle past the impress surface and at that place, depending on the filament, extremely stubbornly clogs the nozzle. This problem is called "retrograde extrusion".
It is therefore important to set the printer nozzle at the correct height. Equally a dominion of thumb, the height should exist smaller or at virtually the same size as the diameter of the printer nozzle, it is best if it is smaller than a quarter of this bore.
And then the extruder exerts plenty pressure level on the filament to make it adhere. It is lightly pressed, but not forced dorsum.
Wrong Temperature Setting
Setting the correct printing temperature can sometimes be an art in itself. Information technology is important to keep the temperature suitable for your filament.
PLA is best used at 180 °C, ABS from temperatures of 225 °C. Nylon filaments tolerate much higher temperatures. In that location are besides nozzles especially suitable for certain materials and particularly high temperatures.
If the temperature is set too low, the cloth does not liquefy properly and settles inside the nozzle. The pressure on the impress head increases and the nozzle becomes clogged.
If, on the other hand, the temperature is also high, a so-chosen "heat creep" tin can result. The material is heated so much that it becomes liquid long before it is fed to the nozzle: So the heat travels up or back.
Liquid filament requires college pressure level. The motor is overloaded, cannot keep up, and the nozzle is blocked. In some cases, the material tin can also deliquesce into its constituents so crystallize in the nozzle head.
It is therefore of import that yous stick to the right temperatures!
Exercise too makes perfect: with a little experience, y'all will rapidly determine which textile produces the all-time printing results at which temperature.

When changing between unlike types of filaments, brand certain that you e'er remove all residues from the nozzle, so that but the newly inserted material is heated afterward and the temperature is really adjusted to the material in the nozzle.
Also, note that a material alter merely works correctly under estrus and that the material should non be inserted into the printer with excessive strength or pressure.
Low-Quality Filaments
Particularly in various online shops, dealers are luring customers with filaments from rather unknown manufacturers at ridiculously depression prices.
That'south tempting, of course. Especially if you're new to 3D printing, y'all'll probably want to try out different things and make all your ideas come truthful.
This can quickly get expensive because good filaments are expensive. Cheap filaments are attractive because of their toll, but in most cases, they cannot keep up with the quality (exceptions confirm the rule as always).
Low-quality filaments do not have fixed tolerances, which means that the filament strand does non take a compatible bore or varies simply within certain tolerance ranges.
If the strand is of different thickness, the melting betoken likewise varies. The filament, therefore, does not catamenia cleanly and evenly and can lead to unclean printing and clog the nozzle. In addition, filaments are of poor quality if they are not "pure", i.e. they tend to contain unwanted ingredients.
These "stretch" the mass in order to brand information technology more voluminous and thus be able to sell large quantities at low prices. Or they imitate the characteristics of solid brand products with cheap merely less good additives.
Then before buying cheap filaments, you lot should practise some research, read reviews and, in case of uncertainty, prefer proven products that can be more expensive. You can also check the quality of your filament yourself by checking the diameter of the strand at different places (best with a caliper gauge*). If the values differ greatly, it is improve not to utilise the filament to forestall bug.
Grit & Dirt
Dust, dirt and other deposits on the filaments "drift" through the extruder and the nozzle during printing. They melt and are thus carbonized and consequently extremely hardened.
A stubborn layer of clay is formed in the nozzle, which narrows the printing opening and leads to further blockages.
Y'all cannot completely avoid deposits. You have to reckon with and take such pollution in large parts. However, you can reduce them past storing your filaments in clean vacuum bags or at least plastic bags after opening the package and keeping them protected from clay. Also, check the filament for cleanliness before each utilize.
Ane cause of contamination inside the printer, in general, may non be so obvious but is ofttimes the cause: the apply of spray varnish on the finished object. Many printing enthusiasts want to give their prints a colorful look right after press and utilize different sprays.
These fly around in tiny aerosol and settle on and in the printer. This can also pb to permanent blockages of the nozzle and other components. If you are using ink sprays, please do so equally far away from the printer as possible – preferably not in the same room!
Don't Burn Anything…
Perhaps the following situation sounds familiar to you lot: Your printer is printing and y'all're doing something else in the meantime. Maybe you forget the press for a curt fourth dimension and but when the printer has finished its work, you lot return to the printer.
Only to prevent filaments from drying out and burning in subsequent prints, you tin enter a command to make the printer stay warm later on printing is finished. This way, you lot go on the filament fluid or at to the lowest degree soft, even if you are not nowadays.
Nozzle Cleaning
Now that you know how to recognize a blocked printer nozzle, how such blockages occur and how to avert them, we want to equip y'all for the instance of emergency.
The printer nozzle is chock-full, nothing works. What to do?
We have put together methods for cleaning that you tin can try one after the other or at your own discretion. Y'all can also repeat each method as frequently as you like.
When used correctly, they will not harm your printer or nozzle. Please annotation that the printer nozzle can be very hot. So be careful.
Depending on how badly the nozzle is chock-full, different methods are used:
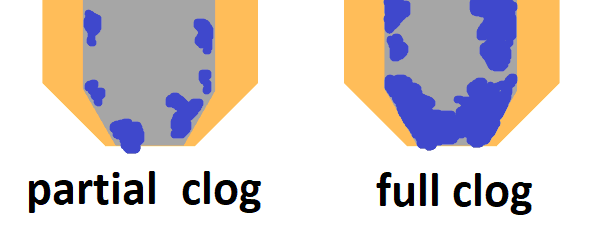
Full Clog:
- Needle
- Acetone
- "Atomic Pull"
- "Cold Pull"
- Incineration
Cleaning Filament
Straight at the beginning of our cleaning methods still some other slice of advice for prevention: Cleaning filaments*.
Cleaning filaments are made of a material especially suitable for cleaning a printer nozzle. They are inserted and so used in print passages co-ordinate to the packing instructions. Dust, dirt, filament residues and other deposits attach to them and are then mechanically removed with the print.
We recommend that y'all carry out such cleaning operations regularly. Considering in one case the nozzle is completely clogged, even the best cleaning filament will non help.
In order for this to work effectively, there must be at least a partial pressure menses. Cleaning filaments are rather expensive in the buy toll. However, y'all only need very picayune of them per cleaning wheel!
Fifty grams cost most 20 bucks, but you can practice betwixt seventy and 100 runs with it. So even if yous apply your printer regularly and make clean information technology regularly, yous will be able to employ this amount for a long fourth dimension.
Push Filament Through
Frequently, unwanted printing results do not immediately block the entire nozzle, just merely slight deposits accept formed at the opening and around the nozzle.
With this method you use white ABS or white nylon similar to cleaning filament – but a bit more complicated. And then if yous need to do it apace and y'all have some left, y'all don't accept to expect for the cleaning filament to arrive.
- Pace 1: Oestrus the nozzle to 200°C to melt the filament.
- Stride 2: Remove the filament from the hotend.
- Step iii: Carefully make clean the exterior of the nozzle with a paper towel.
- Footstep four: Manually push the filament into the nozzle as far as it volition go, or until some of information technology is extruded.
- Stride v: Pull the filament out again.
- Pace 6: Cut off the dirty/blackened finish of the filament.
- Step 7: Repeat steps 4 to half dozen until the filament remains white.
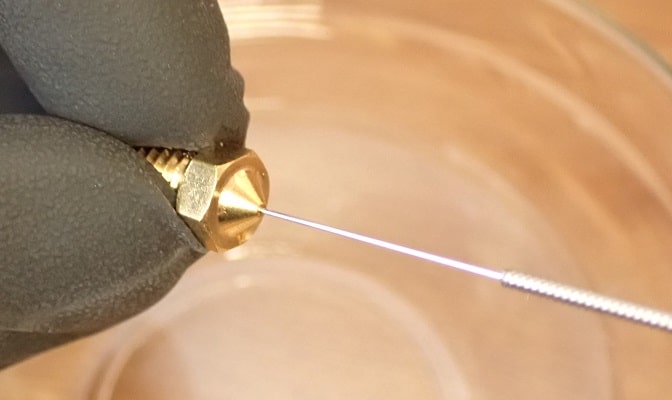
Needle
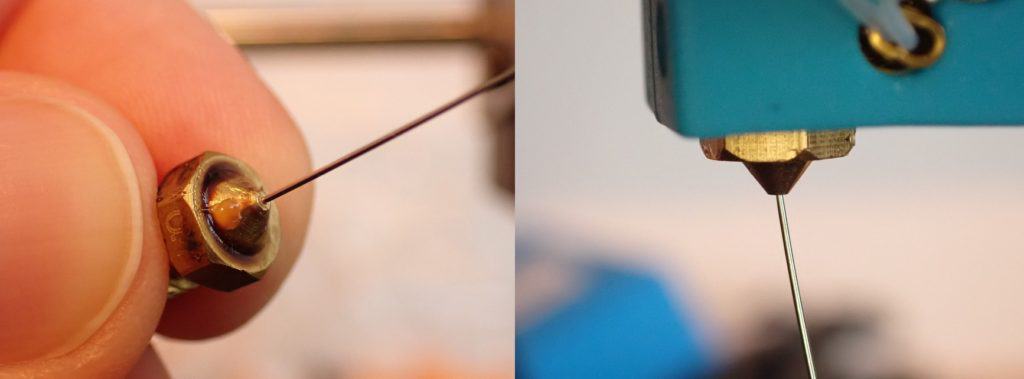
This method is based on manually unblocking the blockage with a needle. Y'all tin use this method with a common cold and a hot nozzle.
Set the temperature of your printer to the temperature that suits your printed material. At present insert a very fine and pointed object into the nozzle and move it slightly until the dirt comes off. When yous extrude new filament subsequently (ideally cleaning filament first), the loosened contaminants are pressed out with it.
Some manufacturers include cleaning kits made specifically for the printer when you buy it or offer them for dissever purchase. Here you can take a look at these cleaning kits of the different manufacturers:
These kits usually include needles or like cleaning tools that you insert into the printer. If y'all are stuck with the above-mentioned household remedies, such a kit is highly recommended!
Of course, the needle or other cleaning tool should not be thicker in diameter than the diameter of the printing opening. In the worst case, y'all could impairment the opening irreparably!
Acetone
If y'all used (at least for one of the terminal prints) a filament which is very easily soluble, you can besides clean a chock-full printer nozzle chemically.
For this, you demand acetone*.
Remove the printer nozzle and identify it in a container in which you encompass the nozzle completely with undiluted acetone.
Allow the nozzle to soak for at least twenty-iv hours and move information technology back and along from fourth dimension to time during this fourth dimension to loosen clay.
In betwixt, you lot can remove internal dirt with a needle. Do this as often equally necessary until there is no more than clay.
"Atomic Pull"
In this method, the material is fed into the printer, extruder or nozzle and then quickly pulled out once again.
The steps between insertion and pull are unlike. Basically you can test all pulls. The "atomic pull", which we will now explain to y'all, is only suitable for printers with Bowden blazon*.
The "atomic pull" uses the same impress material for cleaning as was used for the print itself. Information technology is heated, then cooled downwardly and pulled out again in a jerk presently before solidification.
And it works like this: Offset, remove the clamp of the Bowden hose. Set the printer temperature 30 degrees higher than specified for the filament used. And then insert virtually a mitt length of filament (as white as possible, preferably pure white) until either an fifty-fifty strand of filament comes out again or you cannot push it any further in. Then adjust the temperature to the following values and expect until the extruder has reached this temperature:
- 145 °C for nylon
- 110 °C for ABS
- 90 °C for PLA
As shortly as the temperature is reached, pull the filament out of the extruder over again with a steady wiggle. Practice not use forcefulness! It should be possible to release the strand with only slight resistance.
At present, look at your extracted filament. What does the tip look like? If the front tip of the strand is dirty or discolored, the nozzle is still clogged. Repeat the process until the filament is clean.
If you can't pull the rope out at all, echo the whole process with slightly higher temperatures until the rope tin can exist easily loosened. Then you can repeat the process until the strand is clean. Your printer should and so produce perfect results over again.
"Cold Pull"
This method is peculiarly suitable for heavy blockages and hardened deposits in the printer nozzle. It is essentially based on very high temperatures.
Heat your printer to 250 degrees Celsius for at least five minutes. Use nylon or ABS filament. These are extremely heat-resistant. Push the filament manually through the printer or extruder.
The intense heat causes deposited dirt and filament residues to loosen and melt into the nylon/ABS used. Together with nylon/ABS the blockage is then pressed out. Let the printer to cool downwards until the nylon/ABS becomes solid. Then heat the printer to 120 to 130 degrees Celsius. So pull out the filament strand with a jerk. This jerky movement of the cooled material gives the method its name.
Incineration
This method can exist seen as the "emergency solution". It combines uncontrolled heat with transmission forcefulness.
Remove the nozzle from your printer. Hold the nozzle with pliers over a strong flame, such equally a gas or Bunsen burner, blowtorch, or hot air dryer. Concord the nozzle over the flame with the press opening facing downward.
If textile now drips out of the opening, the deposits are loosened. If you concord the press nozzle with the opening confronting a light source, you can encounter whether it is already free and lite can become through.
If this is not the case, hold the nozzle over the flame once more and simultaneously pierce the nozzle opening with a pointed object to additionally loosen the blockages. Y'all can also lightly tap the nozzle on a firm surface to loosen the deposits.
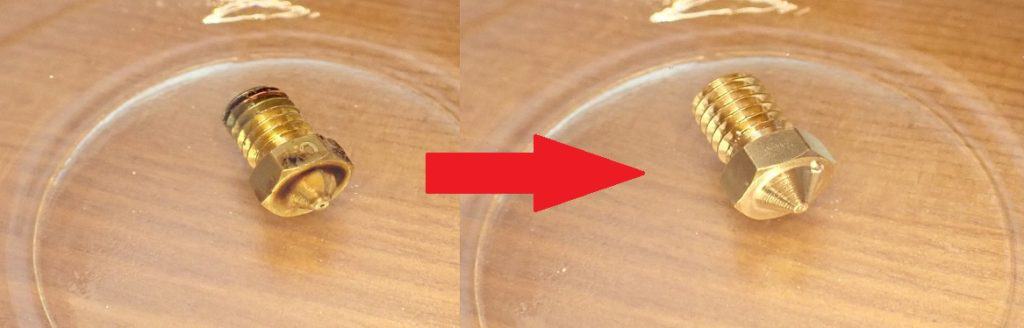
Replacing the Nozzle
Despite all prevention and all tips for cleaning the press nozzle, it may happen that the nozzle cannot be cleaned anymore and your print will nonetheless look unsatisfactory. So sometimes only the buy of a new printer nozzle* will help.
Prevention
As a treat, we have put together a minor checklist of cleaning tasks for yous at the stop and divided them according to how often they should be carried out.
And then you lot have a simple list at hand that, along with our tips, will aid you keep your printer clean and avoid problems with the printer nozzle.
If your printer is in daily and abiding use, the following checks and maintenance procedures have proven to exist useful:
Daily
- Remove grit, dirt and debris from the printer earlier use.
- If possible, have the nozzles cleaned automatically earlier each print.
- Check movements of the axes and all moving parts.
- Are the printing profiles ok?
- If you already know that the printer will not be used for the adjacent few days: Remove the filaments and roughly clean the nozzle with a metallic or toothbrush and needle (or guitar cord or wire brush pilus or paper clip or toothpick).
Weekly
- Make clean the printing bed with a fine spatula and rinse under lukewarm h2o.
- Calibration of the printer, especially if the nozzle or other has been removed (for example to make clean the nozzle with our tips).
- Rough cleaning of the nozzle with metal- or toothbrush and needle (or guitar string or wire castor pilus or paper clip or toothpick)
Monthly
- Use of cleaning filaments*
- Complete (re)calibration of the printer
- Search for software updates
- Clean and oil round rods and bearings
- Remove lubricant from spindles and re-oil
Quarterly
- Complete cleaning of the extruder
- Cheque all cabling and the principal lath
Disclosure: This website is the property of Martin Lütkemeyer and is operated past Martin Lütkemeyer. Martin Lütkemeyer is a fellow member of the Amazon Services LLC and other Chapter Programs. These are chapter advertisement programs designed to enable websites to earn advertising acquirement through advertisement and linking to Amazon.com and others. Links marked with * are affiliate links.

Source: https://the3dprinterbee.com/3d-printer-nozzle-cleaning-guide-clogged-nozzle/
Posted by: goodspeedabadvionand1968.blogspot.com
0 Response to "How To Clean A Clogged Heater Core"
Post a Comment